Thursday, September 27, 2012

Infinity Scarf with Knot


          My Junior year of college I studied abroad in Ireland, and the experience has stuck with me ever since. Even now, three years later, I find myself daydreaming about the little trips we would take around Europe on a shoestring budget. My Galway Girls know that to start talking would mean pages upon pages of memories from our six months of traveling, mishaps, culture shock, and European fashion. I won’t bore everyone! Anywho, my friends and I would frequently bring only a couple outfits wherever we went because we couldn’t afford to check our bags. With this, came some ingenious accessorizing. My favorite: scarves. Every city we went to we could find scarves to dress up a T-shirt and jeans. AND they were always dirt cheap – particularly in Italy where they had scarves literally lining the streets in the markets. Back in the USA scarves were also a hot fashion item, but not quite as cheap as in Europe.
          This year I see scarves popping up again and now that I have a sewing machine, I have been desperate to try to make my own. Infinity scarves are the newest trend. After looking at a few different tutorials, I came up with my own! Let me know what you think and if you guys have any suggestions!


Infinity Scarf with Knot


What you will need:
  • 1 ½ yards of fabric (you’ll only need half)
  • The Usual Suspects: sewing machine, thread, scissors


Step 1: Cut 1 ½ yard of fabric in half the long way (the hotdog way, not the hamburger way haha). You will only need one half.


Step 2: Cut the half of fabric you will use in half again the long way – you’ll have two long strips of fabric.


Step 3: Fold each strip of fabric in half (the long way) with right sides facing each other. Sew ¼ inch seam down length of each folded piece of fabric to make two long tubes.


Step 4: Turn tubes inside out.

Step 5: The knot. You can do as many loops as you want. This fabric was being fussy, so I just stuck to one looping. This is easiest to explain with pictures:


Step 6: Sew associated ends together by putting ends of tubes from opposite ends together. To start sewing, take two ends and put the right sides of the fabric together. Sew seam around circle (to close the tube), leaving approximately one inch open. You will have to stitch this opening closed from the outside but you’ll have a mostly discrete seam. If this part is confusing, please ask me questions, I’m having trouble describing this step! Maybe the pictures will help.


Step 7: Once you’ve completed sewing the tubes together, you’re done! Just fluff and wear J


Model status pshh. Note the bikes on my deck. lol


 Sheshy.

Thanks for stopping by! Anybody else making scarves lately?? Let me know! :D

Wednesday, September 26, 2012

Door Jammers


The Door Jammers tutorial has been updated and improved! You can find the new tutorial HERE. This blog has moved to CraftyBridge.com


Thanks for stopping by!
Bridget

XOXO

Thursday, September 20, 2012

Plush Fabric Pumpkins


          Fall is in the air! This is my FAVORITE season. From pumpkins to apple picking, farm stands to Halloween. I love it all. Perfect New England weather happens between September and November, not to mention the foliage! Anywho, for the first time I have an opportunity to do a little seasonal decorating. Usually my fall decorating consists of pumpkin flavored coffee and Sam Adam’s Octoberfest. But, last week I hurt my back at work and Occupational Health has deemed me unable to work until I complete some physical therapy. This means I have a LOT of time on my hands right now. Of course, I should be cleaning my apartment and doing all of those things that get pushed to the bottom of the “things to do” list every week, but instead, I’m crafting J… and decorating.
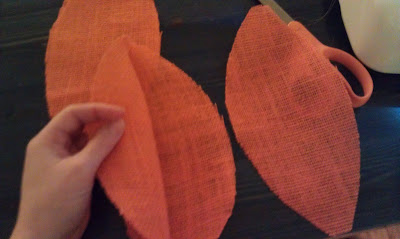
          I found an awesome tutorial on how to make plush fabric pumpkins. Very simple, very cute, and very inexpensive… just how I like it. This site has a template for the wedges to cut out of your fabric, which were a huge help, though the size of the big pumpkin wasn’t as big as I was hoping. Solution: I added a border to the biggest template for a bigger pumpkin. I tried using burlap for one of the pumpkins, which turned out great but was a little challenging to work with. Cotton fabric is definitely the way to go.  These pumpkins are super cute – squashed and plump and perfect!

Plush Fabric Pumpkins:

You will need:
  • half yard of fabric
  • template (see link above)
  • twine
  • large bore needle
  • polyfil or other filler
  • usual suspects: sewing machine, thread, scissors


 Start by cutting out your wedges using the template 


You'll need six wedges


Sew two wedges together, with right sides facing together


Sew a third wedge on, also with right side facing in.


One half complete! Now sew another, separate half with the remaining three wedges


Sew the two halves together just as you sewed the other pieces together, but included the bottom in your stitch. I left the top open to turn the shell right side out and stuff it.


Flip right side out


Stuff with polyfil or whatever you feel like- scraps would work good here too!
Then, with large-bore needle, string twine through the middle of the pumpkin and tie a knot on the end ( so it won't slip through). Loop the twine around the outside of the pumpkin, up the wedges and back down the center of the pumpkin. Repeat around the pumpkin. 
The tutorial link added some leaves and cinnamon sticks for stems - they're on my grocery list.  So cute!


Happy Fall!


Tuesday, September 18, 2012

Envelope Pillow Covers


          True confession: I’m obsessed with pillows. Truer confession: I hate buying them. They are unreasonably expensive. So, I settled for a menagerie of discount pillow finds that I change the covers on whenever I feel like it! Presto – new pillows! The easiest and cheapest way to change up a room – especially with this tutorial!
          Frequently, I find pillows on the clearance rack because they’re “out of season”, and most of the time you can take the covers off of them, leaving you with a pillow form that is much cheaper than buying one at a craft store. 
          I've started to get sick of my summer pillows lately, especially now that fall is starting to creep in. So today I replaced a few of my envelope pillow covers with new ones in a cute fall fabric! An envelope pillow cover is essentially a pillow wrap. With only one piece of fabric and four straight lines to sew, it doesn’t get easier. Plus, it’s incredibly simple to remove and wash!


Envelope Pillow Cover

You will need:
              Pillow form
              Enough fabric to wrap around pillow  - approximately half yard for 18x18in pillow form
              The usual suspects: thread, pins, sewing machine         
  
Step 1: Wrap fabric around pillow form to ensure fit. (here, I just used my old pillow cover as a template)


Step 2: Finish long ends of fabric by folding in and sewing approximately ½ inch


Step 3: With inside out, fold cover so that ends overlap. Make sure to keep pillow size in mind (i.e. don’t overfold, because the pillow won’t fit inside later! Try putting pillow inside and pinning ends together to ensure good fit, then slide out pillow.).


 Step 4: Pin and sew open ends closed.


Step 5: Turn pillow cover right side out!


Just tuck pillow inside!


Note: You can always overlap the fabric more than I did - the preference is all yours. And remember, you can cover any pillow with this cover, it doesn't have to be a pillow form; just check to make sure that your underlying pillow pattern doesn't show through.

Total expense: 1/2 yard of fabric! BAM!

Tuesday, September 11, 2012

Hemming Pants


So this might be an underwhelming topic, but I can’t hide my excitement. While project hunting last week at a local thrift store, I found an amazing pair of designer jeans; Seven for All Mankind bootcut jeans in my size!! What would normally run for around $250 a pair cost me $25.00. I tried them on and they fit perfectly – including my, err, assets. BAM! Only one problem… they are about six inches too long. From the knees down I look like a five year old trying on my mom’s clothes. Fail.


Or maybe not.

When I was about ten years old my Grandma started to teach me how to sew. I wasn’t the best student, and I wasn’t enthusiastically interested. But one thing she taught me stuck – how to hem pants. Who’da thunk.
My Grandma grew up in the Great Depression and learned how to sew at an early age out of necessity. She was a mill worker at Healthtex during my father’s childhood, making children’s socks and other clothing. She worked at the center of two production lines where they meet in an X because she could sew so fast – doubling her production time from everyone else around her. She was amazing! She married my grandfather, a civil engineer for the Army, at a young age and had seven (SEVEN!) kids. Needless to say, money was not an object of abundance. She made all of my aunts’ and uncles’ clothing and seconds for dinner were only for those who could eat the fastest, but love embraced everything my Grandmother did (and does!).
In honor of her, I will share this simple, but essential tip for saving pants (especially designer pants) from getting tossed aside just because us short people are just that – short. And for that matter, keeping us short people from being depraved of designer clothes. Amen.

How to Hem a Pair of Pants

You will need:
Pins
Denim needle for sewing maching (if hemming jeans)
Scissors 

        1.  Put on the pants ( for the sake of this post, I’ll say jeans). Fold up the jeans to the length that you want the hem to sit.


             2.    Pin the fold.
    3.  Take the pants off and make sure that both legs are even.
    4. Cut above fold approximately a half inch to leave room for the hem fold.


              5. Turn pants inside out and begin folding and pinning. Create two folds to ensure that the frayed edge will be tucked in. Pin down. If you are having trouble with the folding, try ironing down the original hem fold, then tucking the top under later to pin.


        6.  Sew along highest edge of hem.


         7. When working with the second leg, after pinning, lay next to first finished leg to ensure even hemlines.


                      Yay! Pants that fit!


      Tip: If you want that distressed look at the bottom of you pants so that they match the original bottoms, take some sandpaper and muss up the edges. This will make them look store bought!

Friday, September 7, 2012

Sand Weights


               I live with my boyfriend, Joe, who frequently joins me on my adventures (creatively coined the Adventures of B&J). We have never been afraid of doing new things, which has truly provided us with incredible experiences and fueled my desire to tackle my DIY side.
               Joe has a particular passion for adventure and endurance running, which he blogs about at Instinctual Running. He has been itching to get me to start a blog for months. Finally, the other day he asked if I would guestblog on his site about how to make sandbag weights for his cross-training workouts. Joe and I originally thought to make them when we ran an obstacle race earlier this year that used them as part of an obstacle. We looked into buying them, but quickly learned that the shell alone can cost up to $100 each. Really, they’re glorified pillows with sand in them. So I decided to make them! I chose durable, utility fabric instead of the neoprene that others were using… they have held up great!
Here’s how to make your own weights… great for workouts, doorstops, sandbag seats or whatever else you can come up with!

How to make your own Sandbag Weight

2 yards Duck Canvas-  single or multi colors ($10.99/yd)
piping filler (about $6 bucks)
Sewing Machine with zipper foot
Bag of Playground Sand ($4.00 per 50lb bag)

Step 1:
  •          Cut circles from fabric to desired size of sandbag
  •          The easiest way to cut a circle is to find a bucket or bowl about the size you want and trace it onto the fabric with chalk – this will ensure a symmetrical and round circle.
  •          Remember, you will need at least a half inch around the edge of the fabric to sew on piping.

Step 2: Piping
  •          First, you’ll need to cut strips of fabric to sew over the piping.
    •          Fold from corner of fabric to make a 45 degree angle. Measure & cut 2 inch strips of fabric on the diagonal (this will prevent twisting when sewing).
  •        GREAT site to learn how to sew piping – it’s easier than you think!


  •         Pin together strips (overlap edges a bit)  as shown in the picture and sew pieces together
    •      Once sewn, they will make one long strip of fabric 
  •      Take piping and place in the middle of sewn strips and sew tightly against the piping using the zipper foot.

Step 5:
  •          Once Piping is complete, cut slits (about 1cm apart) along the sewn piping liner. Do not cut past the stitch in the piping, though!

Step 6:
  •          Pin down the piping liner just inside the cut circles of fabric, with the open end of the piping facing outwards around the circle.


Step 7:
  •          Sew down the piping around the circle, removing the pins as you go.

  •          When it comes to sewing the two ends of the piping together, overlap the two ends in an X, with the ends pointing outwards (toward the outer edge of circle). Sew over middle of X to “seal” out ends.
  •          One half is complete!

Step 8:
  •          Take the second circle and lay on top of completed half, outside facing up. Pin down around outer edge of piping and sew top layer as closely to piping as possible. Be careful to leave an opening approximately four inches long.

  •          Turn sandbag shell inside out.

Step 9:
  •          Fill with desired amount/weight of sand.

Step 10:
  •          Fold edge of opening to match up to piping and pin. Sew along folded edge to close up opening.


Voila! Your sandbag weight is complete!

We were able to make four sandbags with 2 yards of fabric – two 30lb and two 10lb.  We needed an extra bag of sand, but had some left over.
Total: $32.00 for four sandbags

I thought to add handles, but Joe didn’t want them. If anybody tries to add them, let me know how they work!

Please post questions if you have them! :)