Saturday, November 24, 2012

Small Business Saturday

          Happy Thanksgiving weekend y'all! I hope all of you had a splendid holiday and kick-off to holiday shopping yesterday. I also hope that none of you got trampled on your way to pick up the biggest TV you could fit in the car! I had a surprisingly laid back shopping experience yesterday. My Dad and I went to Target around 8:00am and found the place quiet (the super-shoppers had come and gone and the normal shoppers hadn't woken up yet!). We got most of the items we wanted and a few more... for us. I can't lie, I'm a terrible holiday shopper... I end up buying just as much for myself. One for you, one for me... two for you, one for me. Honk if you can't resist a great deal!
          In the spirit of thanksgiving and giftgiving, I want to remind everyone of what great day it is; Small Business Saturday! Give those small businesses in your area a shot today and take advantage of some of their deals and personable service. It is incredibly hard to maintain a small business in this economy and they can use all the support we can give them. Not to mention, supporting small business puts money directly back into our communities - fueling local economy. So think small and SHOP SMALL today and throughout the holiday season!

If anybody would like to check out my Etsy Shop: CraftyBridge , I sell small handbags, clutches, and a various assortment of other gifts and accessories. I update new items frequently, so check back often!

Did you shop small today? Let us know how you supported your local economy!

Cheers, Bridget XOXO

Monday, November 19, 2012

Tile Coasters

          I have been in full blown gift mode for the past week and I’m almost giddy with all of the ideas swimming around my head. Not to mention that every blog I look at is also teaming with brilliant/sweet/pretty/trendy gift ideas. It’s a great time of year to be a crafter.
         One of my favorite gifts to make are these tile coasters – made from plain white ceramic 4x4” tiles and gorgeous scrapbook paper (which I have boxes of… from a long time, extremely slow moving scrapbooking period in my life). Talk about an inexpensive craft. The tiles cost me $.16 a piece. But these cuties come out looking amazing.

Tile Coasters

What You Will Need:
  • 4x4” Ceramic Tiles
  • Scrapbook Paper or Fabric cut into 4” x 4” squares
  • Mod Podge
  • Clear Acrylic Spray Paint
  • paint brush or foam brush
  • Optional: Felt Tiles or silicone caulking for bottoms


Step 1: Clean the tiles and cut your fabric or scrapbook paper. Here I used scrapbook paper.

Step 2: Apply a coat of Mod Podge to each clean tile. Place square of paper in center of each tile.

(I used a cereal box to protect my surface... good and thick so nothing will leak through)

Step 3: Let paper adhere to tile by waiting 15 minutes after applying. Then paint over paper with a coat of Mod Podge.


Step 4: Apply 2-3 more coats of Mod Podge, allowing 15 minutes between coats.

Step 5: Let Mod Podge dry completely.

Step 6: Take coasters outside and spray paint with clear acrylic paint. This will seal the coasters and make them waterproof. Let dry according to paint can instructions.


Step 7: Glue felt squares to backs of each coaster. Let dry.


Now… grab a drink! Enjoy your coasters!
Makes an awesome, personal gift :]

Cheers, 
Bridget XOXO


Saturday, November 17, 2012

Slate Cheese Board

   I can’t tell you how frequently people are surprised by my crafty side. It makes me laugh when people are shocked that I have made something… it makes me feel a little bit like I have an alter ego or something. Like most people, I’m a professional at work and I’m somebody else at home – a partner, a homemaker, a cook, an eater, a bum. Therefore, most of my coworkers and former classmates have never really met craftybridge. Of course, writing a blog about my creative side bridges the gap between my two just a bit haha. 

          This project showcases the alter ego of slate tiles… making slate tiles into chic cheese boards with a chalkboard accent! Dirt cheap and super simple, this craft will make you just as giddy as I was when I made it…


Slate Cheese Board

What You Will Need:
  • Slate Tile(s) - $1.69 at Home Depot (12x12”)
  • Chalkboard Paint
  • Silicone Caulking
  • Chalk

Step 1: Scrub the Dickens out of that tile. It came from Home Depot. Soap and Water. Scrub – a –dub – dub.


Step 2: Once the tile is dry, paint one layer of chalkboard paint onto a section of the tile.


Step 3: Paint another coat of chalkboard paint once the first coat is dry.

Step 4: Once the paint is dry, flip the tile over. Pipe silicone around the edges and in consecutive squares towards the middle of the tile (see picture). This will protect any counters or tables that the tile is placed on.  Let dry according to package instructions.


Add a piece of chalk and throw yourself a wine and cheese party. You rock.

Please note: handwash only

Would make an amazing gift! Maybe even pair two together? Let me know how yours turns out!!

Cheers, Bridget XOXO

Saturday, November 10, 2012

Holiday Plates


          Woof, it has been a rough week here – the slew of storms (hurricanes, nor’easters… you name it, it happened here in the past two weeks) has knocked my immune system down and I’ve been battling a cold for a few days now.
          Last week I found myself in Homegoods (how did I get here?) and I raided the discount Halloween stuff. On top of that, I found a dish set on the clearance rack for $10 because one dish was cracked…. That’s 20 dishes for $10. All plain white. Amen.
So I stopped next door at JoAnn’s (Yes, it’s next door. Yes, it’s very dangerous.) and grabbed a couple paint pens. I previously used Sharpies to draw on mugs, which worked great, but I’ve been wanting to try these pens for a while and they aren’t that expensive.

This is what I did: I drew on some of these cute plates for sweet holiday gifts.
How did I do it?:  I cleaned the plate, drew on it with Sharpie paint pens, then stuck it in a 350F oven for 30 minutes.


I can’t believe I haven’t done this before. Imagine how good those $1 Goodwill dishes could look?? Amazing.
Let me know how your dishes turn out! I love your comments!

XOXO Bridget


Thursday, November 1, 2012

Zippered Clutch


          Happy November!! I hope everyone had a goulish night last night J We will be doing Halloween next week here in Connecticut – the storm damage is too bad in our town to let the kids out and about safely. There are a TON of kids in my neighborhood and I was so excited to finally be able to give out candy (our last apartment had no kids nearby), so if I have to wait a week I will. That is, of course, if I don’t eat all the candy first. I’ve made a pretty big dent already.
          Anywho, I’ve been experimenting with clutches lately and this is one of my favorites. Simple, but adorable and looks so much harder to make than it is. Bring it on, Vera Bradley.
          Don’t be intimidated by how long this tutorial is – I just went overboard taking pictures. This is VERY step by step for my beginners who are afraid of zippers.

Zippered Clutch

What you will need:
  • Outer Fabric (10”W x 12”H)
  • Fusible Interfacing (10”W x 12”H)
  • Lining Fabric (10”W x 12”H)
  • 9” Zipper
  • Strip of Fabric for handle (3”W x 12”L)
  • The Usual Suspects: thread, pins, sewing machine, scissors

Step 1: Cut all pieces of fabric

Step 2: Press outer fabric, interfacing and liner together in a sandwich with outer and liner right sides out and interfacing in between with fusible side to underside of outer fabric. If you are totally lost, please comment and I’ll help you.


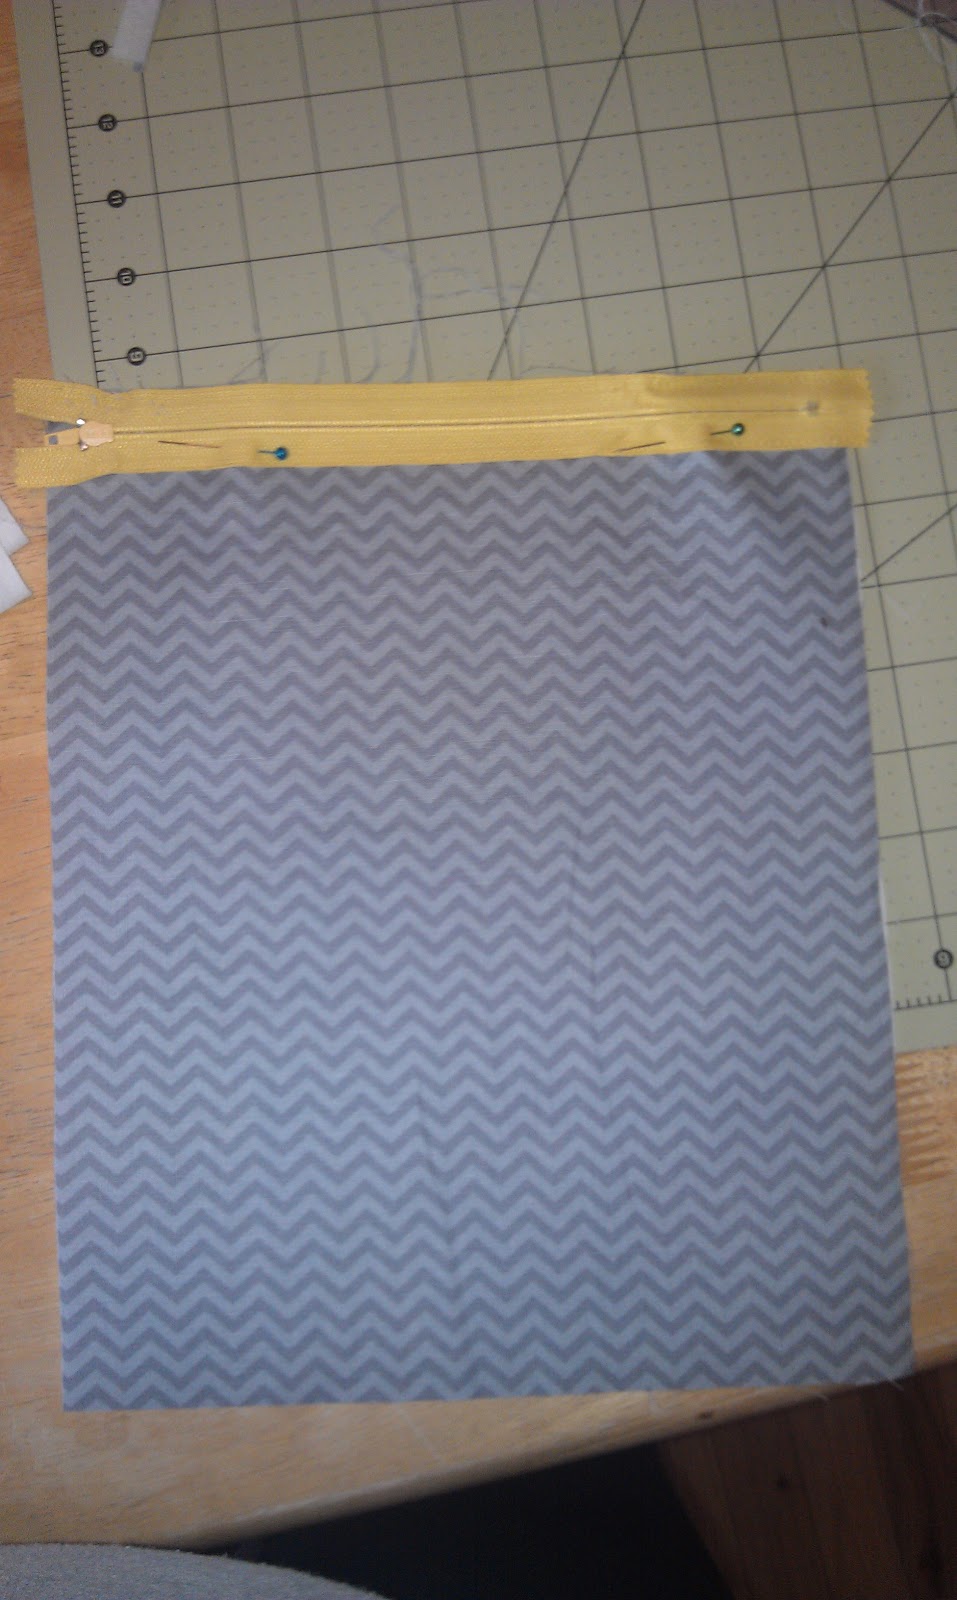
Step 3: Pin zipper face down to top of fabric “sandwich” with outer fabric up.


Step 4: Sew down the zipper along edge.

Forgive my stitching - I had a fight with my sewing machine

Step 5: Fold fabric in half with outer fabric in – pin zipper down – it will look like this: top of zipper abuts outer fabric. Sew.


Step 6: Here you can top stitch – turn the tube inside out and unzip, then use the zipper foot to sew along edge of seam.

Step 7: Turn tube back inside out. Sew one edge closed.


Step 8: Make the handle:

 press in half

open, fold edges to middle and press

 Fold in half, press. Sew along open edge


Step 9: Place raw edge of handle in line with raw edge of opened end of clutch.


Step 10: Make sure zipper is open! This step is very important! If you don’t open the zipper, you won’t be able to turn the clutch right side out once you sew the open end closed.

Step 11: Sew open end closed.


Step 12: Turn right side out and press.


Now do a dance. How bleeping cute is that clutch? I know.

If you have any questions or are lost, please comment and I'll help!
Now, go make something :)
<3 Bridget

Want to purchase this clutch? Check out my Etsy page!