Pages

Monday, October 29, 2012

Hooded Cowl

It’s starting to get a little colder here in Connecticut and with the impending doom of Hurricane Sandy, I wanted to make something "frankenstorm" appropriate. The other day I was digging through my fabric pile and found some gray fleece I had bought out of the remnant pile at Joann’s. I wanted to make a cowl this year for the cool weather, and decided there was no better time than now. Granted, it honestly isn't that cold out - we're more concerned about flooding since we live about a mile from the shore, as well as gale force winds. Luckily for us, we are somehow not it the flood zone. Work is cancelled for Joe (and the rest of the state), but as a nurse I'll be tackling Sandy later to relieve my coworkers at the hospital. No worries, Keep Calm and Sew On.

Hooded Cowl

What you will need:
  • ½ - ¾ Yard Fleece or other warm fabric (I held the fabric over my head to see how "tall" I needed it to cover my head while still covering my neck... and how long I wanted it to hang. And trimmed accordingly.)
  • The Usual Suspects: thread, sewing maching, pins, scissors


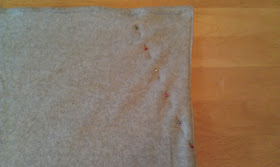
Step 1: With wrong side up, fold and pin edges of long side in and sew.


Step 2: Lay fabric right side up and fold in half the “hamburger” way. Sew the raw edges together.


Step 3: With wrong side out, pin and sew at an angle as shown in photo: 30degree angle from side, approximately 6-10" down side. This will create the hood and keep cowl from sliding off head when pulled up.


Step 4: Put it on!! Here’s how:

back (seam)
bottom  top
front


Stuck in the cold without a hat? no problem! Super cozy, and frankly, it's darn good lookin'.

Happy Hurricaning, Folks!


Friday, October 26, 2012

Etsy Shop

Hi Everybody! Great news!!
I have officially opened my own Etsy shop: 
CraftyBridge

Here is the link :  www.etsy.com/shop/CraftyBridge

You will be able to purchase some of my "projects" there, as well as a few new things :)

Please check it out! And please leave a comment with any suggestions or advice for the site or products - I LOVE to hear your feedback.

Tuesday, October 23, 2012

A Little Inspiration


Something to live by - from the ever inspiring Julia Childs :) 
Happy Tuesday!

Monday, October 22, 2012

Herringbone Wall Art


          Wow, I have been swamped this past week! It feels good to be back and writing. I never really feel as clear-minded as I do when I’m crafting. I’m so glad I finally have the opportunity to dive into it and really embrace it!
          I found a pin on Pinterest a few months ago that I’ve been desperately wanting to try. It is super easy, cheap, and looks so awesome. We have a wall in our bedroom that is completely bare, and I’m stumped as to what to put there, so I’m giving this a shot: DIY Herringbone wall art by Refinery29. Now, I’m no Picasso, but I think I can pull this off, and you can too.


Herringbone Wall Art

What you will need:
  • Canvas
  • Acrylic paints of your color choice
  • White Acrylic paint
  • Paint Brush (I had some leftover from other projects, anything an inch or bigger works fine)
  • Painter’s Tape
  • newpaper or other surface covering
  • Cup of water (to rinse brush between colors)
  • Paper towels (to dry brush)


Step One: Paint a design! With whatever colors tickle your fancy, cover your canvas. Paint whatever your heart desires! Strips, dots, whatever. I chose to do some blended stripes.
  • Rinse your brush between colors to avoid unintentional blending.
  • Don’t be shy! Cover that canvas!


Step Two: Let this paint dry completely, usually about an hour or two (read the instructions on your paint). If you feel like supplementing your colors a little bit, go for it. I added another layer to some of my colors that I painted on lightly.

Step Three: Cut even lengths of painters tape – I cut my strips 5 ½” long – and start sticking! I chose to do a herringbone pattern like in the tutorial, but anything will work! Maybe try a chevron pattern or stripes, plaid or something abstract.


Step Four: Press down the edges of all of the tape strips. I have some significant tape bleed because I didn’t do this. And you still might have some tape bleed – remember, this is DIY, so embrace it! (I have to tell myself this, because my OCD side winced at first).


Step Five: Paint over your painters tape with a light coat of white paint (you could really use any color here… gray or something bright might look really cool).

Step Six: Once the white paint is dry, start peeling up those tape strips. Use a razor blade or knife if they aren’t budging.


Step Seven: Admire your work! Easy, trendy, and cheap!

Let me know how yours turns out! Please comment with any ideas or suggestions!
Thanks for stopping by :)


Monday, October 15, 2012

Agility Ladder


          Joe has been thinking about making an agility ladder for a little while now. So we brainstormed some simple, cheap options for materials and I helped him come up with a plan for making it. He ordered some inexpensive nylon webbing ($27 for two 30ft rolls, found at countrybrookdesign.com), and it came in the mail yesterday!
          If you are into crossfit training, working out in your own backyard, or just love the idea of making your own equipment and saving a bunch of cash, read on! And take a trip to my DIY/Tutorials page for more workout equipment, or visit Instinctual Running for more ideas.


Agility Ladder
  • 30 feet of one color Nylon Webbing ( this will be for the length of your ladder (totaling 15 feet  with one half on each side… feel free to make longer or shorter to your liking)
  • 17 feet of another color Nylon Webbing ( we just bought two rolls of 30ft with extra to spare… this will be for the rungs on the ladder)
  • The Usual Suspects: thread of color choice, sewing machine, pins, scissors
Step 1: Cut all of your pieces. Cut your 30ft  piece of nylon webbing in half to make the sides of the ladder. Cut 11 18inch strips of the other nylon webbing to make your ladder rungs.
                ** If you want to make a different length ladder, you can measure out how many rungs to make by dividing the total length of the ladder by 18inches, which is how far apart we spaced our rungs.**


Step 2: Pin your rungs onto the side strips by measuring 18inches apart. We chose to use a chalk and mark 18inches all the way down the strips first, but it is not necessary.


Step 3: Once your rungs are pinned onto both sides of the ladder, head to the sewing machine. I sewed two lines parallel to the length of the ladder by sewing, backsewing, and sewing forward again, making three passes. I did this to ensure a strong seam. I probably could have used a better stitch, but it came out very strong.
                **Tip: do your best to keep the rung perpendicular to the ladder side when sewing, to make sure the rung is straight when laid out. The easiest way to do this is to just line the bottom edge of the rung with the webbing. (see picture)


Step 4: Once all rungs are sewn on, lay out your agility ladder and admire your work!!


Thanks for stopping by! Please post any questions, I will be happy to answer them!


Friday, October 12, 2012

Fleece Blankets


          Whew, what a week… had a few setbacks in the back department… physical therapy says one more week at home, officially making this a full month ordeal. In fact, today is the one month mark of my sprain. The body is a slow healer when you want it to go fast, right? Well, due to this one more week at home I have thrown myself (not literally, I’m mostly confined to the couch and my craft table), into gifts for upcoming birthdays, holidays, etc. I got myself all excited for these projects, took a million photos, bladibla… and realized that if I posted tutorials on any of them, the surprise of these gifts would be ruined. Hm.
          So, to cap the week off, I’m going to write about fleece blankets. I have made a slew of them for various people, gifts, myself over the past week. I’m going to show you a few different ways to make fleece blankets, but my tutorial will focus on the sewn version.


Fleece Blankets


What you will need:
  • 2 yards each of two fleece fabrics (I like a big blanket, feel free to adjust to your preference)
  • The usual suspects: scissors, sewing machine, thread


Step 1: Cut off the crappy edges (official term of course) from both fabrics
Step 2: Line up the two fabrics, good sides together,  and cut so that they are even


Step 3: Pin edges together all around blanket (remember to keep those good sides together… you will see why in a few steps).


Step 4: Sew along entire edge of  blanket with a half inch seam, but leave approximately six inches at end open.


Step 5: Turn blanket right side out

Step 6: Blind stitch that six inch hole closed. I would show you how to blind stitch, but I’m not even positive if I’m doing it right. Think of it as a whip stitch with the whip on the inside J that’s the best description I can think of. My apologies… google it.


Step 7: Set your sewing machine to the overlock stitch (also known as the serger stitch) and sew another seam with a 1-2inch seam around the blanket.


Badabing badaboom! A fleece blanket that looks professionally made. How easy was that? You know you want to jump on JoAnn's next fleece sale :) 


Other Options: No Sew
Single knot: Cut strips along edge of blanket and finish with single knot


Double knot: Do same as above, but double knot instead.


Braided: Cut 2" strips along edge of blanket and within each strip, cut small hole. Thread each strip through hole of consecutive strip, following all around blanket. This is easiest with a crochet hook or opened paperclip. This is my favorite for a no-sew fleece, even if it takes a little longer... you don't feel any knots if you lie on the edge!


Happy Friday! If you have any questions or have any other styles for making fleece blankets, please share!!

Sunday, October 7, 2012

Refurbished Wooden Drawers


          The end of this last week into this weekend has been mighty busy for Joe and I as we prepared for the Coastal Lighthouse Run, a race that Joe organized and directed along with his work and Special Olympics Connecticut. All proceeds went to Special Olympics and the turnout was fantastic!! I am so proud of Joe – the race went very smoothly, with only a few minor hiccups!
          I made a fleece blanket to donate as a raffle item and I got numerous compliments on it, with many people asking if I sell my items. I was very flattered… and got to thinking. Would people really buy my projects? It certainly would help support my love for crafting if I could sell my items, but I only do this part time. Maybe I’ll look into Etsy and research my options.
         Anywho, my latest “project” has been a beautiful jewelry box/drawer chest (I’m honestly not sure what it really is) that I found at a thrift shop for $10. It’s all solid maple and handmade, but it was pretty beat up. So I sanded the whole thing down, restained, and refinished it. It might not look too different in the pictures, but it has really taken on a new life.  There is a beautiful burl on the top that really shines with the new finish. Take a look! J


Finished!


Thanks for stopping by!

Thursday, October 4, 2012

Envelope Clutch


          One of my closest and dearest friends, Angela, had a birthday this week!  Angela is an amazing person inside and out – no matter where our paths take us, I know we will always be close.  Angela and I have been friends since the start of nursing school, are both from Massachusetts, were roomates when we studied abroad in Ireland and both landed here in Connecticut for our first jobs. In fact, we only live down the street from each other! I have long adored Angela’s sense of style – she has the best closet in the world. And I can always count on her to be my companion for trips to Homegoods, Goodwill, and any nifty thrift shops. We have both found a little love in giving old things new life… in my case, that includes my patients I suppose ( for those of you who may not know, I work with geriatrics and I love it!).
          Anywho, for Angela’s birthday I wanted to give her something unique and special. Angela has a particular love for bags (bless her soul). We are always ogling over bags at Marshalls. So, I decided I would make her a cute clutch. I found a tutorial on Pinterest by A Place In the Cloud on how to make a simple envelope clutch. I made a few alterations to mine, which I will show you, but the majority of the tutorial is similar. This is the EASIEST clutch to make that I could find - not even any zippers!


Envelope Clutch

Materials you will need:
  • ½ yard outer fabric
  • ½ yard liner fabric
  • Batting
  • Picture of template handy 
  • Ruler
  • The Usual Suspects: sewing machine, matching thread, scissors, iron


Step 1: Cut two pieces of fabric to template. Your two pieces of fabric will look like houses: 13” wide, 16” tall for the sides, with a 6” point above height of walls.


Step 2: Cut batting the same shape of the lining and outer fabrics, but one inch smaller on all sides.


Step 3: Face two pieces of fabric right sides together and stitch along all edges except bottom.


Step 4: Turn right side out. Iron.


Step 5: Insert batting


Step 6: Stitch bottom closed… I ironed the edges in, pinned, and stitched. You could also roll and stitch – whatever you feel like. This will be the edge of the inside fold that will show when the flap is opened. I tried to make mine as neat as possible, but it was a challenge. Sorry, forget to take a picture of this step!

Step 7: Fold “inside out”. Fold bottom up so that lining is on outside. The lining will be on the outside at this point. Stitch sides closed as close to edge as possible.

Step 8: Turn right side out.


Step 9: Fold down top and iron all folds


Step 10: Here I added a sash across the front to help hold the flap down so it would stay closed. I was too afraid to attempt a magnetic closure… I’ll get there eventually, but for now, this is a pretty cute alternative.

Thanks to A Place in the Cloud for the inspiration and tutorial!!

Happy Birthday, Angela! :)